Redmi A5 FRP Bypass 2026: Verified Solutions for Android 15 Go & Unisoc T7250
Quick Summary
- Device Status: The Redmi A5 runs Android 15 Go Edition. This OS strips away “Second Space” and hides system apps by default, breaking older 2024/2025 methods.
- The Problem: The February 2026 security patch has disabled the TalkBack “L” gesture. Furthermore, the “YouTube Update” error now blocks browser access immediately.
- The Fix: You have three options. Method 1 (Free) requires precise timing with the Accessibility Menu. Method 2 (Advanced Free) uses a partition tool but requires driver modification. Method 3 (Paid) automates the process if the first two fail.
Facing a locked device when you need it most is stressful. We understand the frustration of purchasing a second-hand phone or resetting your own device, only to find it acting as a “paperweight” because of a forgotten Google account. If you are staring at a screen demanding credentials you do not have, you are encountering the Xiaomi 25028RN03A Google account unlock protocol.
This guide is not theoretical. It addresses the specific Redmi A5 FRP bypass challenges introduced in Android 15 Go Edition. During our testing, standard APK installation methods failed due to the restricted nature of the operating system. Consequently, success in 2026 requires either a precise “Assistant Settings” command sequence or a dedicated BROM-mode tool.
Quick Comparison: Which Method Should You Choose?
Selecting the correct unlock method depends on your technical comfort level and the time you have available. We recommend starting with Method 1 (Free Manual Loop). If you struggle with the precise timing required, consider moving to software-based solutions.
| Feature | Method 1: Manual Loop | Method 2: SPD Tool (Advanced) | Method 3: Dr.Fone (Automated) |
| Cost | Free | Free | Paid License |
| Success Rate | Moderate (Requires timing) | High (If drivers work) | High (Database Backed) |
| Time Required | 30–45 Minutes | 15–20 Minutes | 5–10 Minutes |
| Difficulty | High (Step-heavy) | High (Driver config) | Low (Click-to-run) |
| Risk | Low | Medium (Bootloader risk) | Low |
Method 1: The “Manual Loop” (Free, No PC Required)
Best for: Users with patience who want a free solution and have a stable Wi-Fi connection.
This is the most reliable free method for the Redmi A5 FRP bypass without PC 2026. Because the A5 runs “Go Edition,” the standard “Activity Launcher” apps often crash or fail to load. Instead, we must use a vulnerability in the Accessibility Menu to disable the setup wizard manually.
Critical Warning: Android 15 Go hides system apps by default. You must follow Step 3 exactly to reveal the “Android Setup” app, or this method will fail.
Step 1: Enter the System via TalkBack
- Start at the “Hello” welcome screen. Connect to a strong Wi-Fi network.
- Enable TalkBack: Press and hold Volume Up + Volume Down simultaneously for 3 seconds. A pop-up will appear; tap “Turn On.”
- Hold both buttons again to fully enable TalkBack.
- The “L” Gesture is Dead: Do not try drawing an “L” on the screen; it no longer works on the Feb 2026 patch. Instead, tap the Accessibility Icon (green man or three dots) if visible, or simply use the Volume keys again to trigger the Assistant prompt.
- Voice Command: When the Assistant activates, clearly say: “Open Settings.”
- Troubleshooting: If Voice Command fails or internet is slow, tap the keyboard icon, type anything (e.g., “123”), double-tap to highlight text, select Share > Gmail, and use the “Help & Feedback” menu inside Gmail to search for “Delete or disable apps.”
Step 2: Prepare the Apps (The Hidden Step)
- Once you are in the Settings menu, scroll down to Apps (or “App Management”).
- Tap All Apps.
- Crucial Step: Tap the three dots in the top-right corner and select “Show System Apps.” Without this, you will not see the files you need to modify.
- Locate Android Setup (look for the Clock icon, not the gear icon).
- Tap it -> Force Stop -> Disable (if available) -> Clear Cache.
- Locate Google Play Services.
- Tap it -> Force Stop -> Disable.
Step 3: The “Disable Loop” (Timing is Key)
- Keep the Accessibility Menu Shortcut (the floating green button or two-finger swipe) active.
- Back out of Settings completely until you return to the Wi-Fi / Setup screen.
- Proceed with the setup. The phone will reach the “Checking for Updates” or “Just a Sec” screen.
- The Glitch: Because Play Services is disabled, the phone will hang or loop on this screen.
- The Fix:
- Watch the spinning circle. Wait for it to spin fully twice.
- Quickly tap the Accessibility Shortcut > Assistant > Settings.
- Enable Google Play Services immediately.
- Why this works: You are re-enabling the services after the security check fails but before the setup crashes. If you time it right, the “Checking” screen will disappear, replaced by “Google Services,” allowing you to finish setup offline.
Method 2: Free SPD Tool & Unisoc Driver Fix (Advanced)
Best for: Technicians or users comfortable with Windows Device Manager and installing unsigned drivers.
The bypass FRP Redmi A5 Unisoc T7250 process can be performed freely using the SPD Research Tool (Spreadtrum Flash Tool). However, this method has a high failure rate on Windows 10/11 due to “Driver Signature Enforcement,” which blocks the connection.
Safety Warning: In the SPD tool, ONLY wipe the FRP partition. Never wipe the Persist partition on a Xiaomi device. Doing so will permanently break your fingerprint sensor and may cause “Find Device Storage Corrupted” errors that require expensive hardware programmers to fix.
Phase 1: Disable Driver Signature Enforcement
You cannot install the required Unisoc drivers on a standard Windows boot. You must do this first:
- Click Start > Settings > Recovery.
- Under “Advanced Startup,” click Restart Now.
- Your PC will reboot to a blue menu. Select Troubleshoot > Advanced Options > Startup Settings > Restart.
- When the PC reboots again, press F7 (or 7) to select “Disable Driver Signature Enforcement.”
- Once in Windows, install the Unisoc/SPD Driver v2.0 (or newer).
Phase 2: The BROM Flash
- Load the Tool: Open the SPD Research Tool (UpgradeDownload.exe).
- Load Packet: Click the gear icon and load the specific
.pacfirmware file for the Redmi A5 (ensure it matches your region: Global, India, or China). - Partition Selection (Critical):
- Go to the “Settings” or “Backup” tab.
- Uncheck ALL boxes.
- Manually select only the
FRPpartition (sometimes labelederase_frp).
- Connect & Flash:
- Click the Play/Start button in the software.
- Power off your Redmi A5 completely.
- Hold Volume Up (boot key) and connect the USB cable.
- The tool should detect “Unisoc Usb Serial” and flash the partition in less than 5 seconds.
Method 3: Dr.Fone – Screen Unlock (The “Time Saver”)
Best for: Users who failed the manual timing in Method 1 or cannot get drivers working in Method 2.
If you find yourself stuck in the “Checking for Updates” loop or cannot get your PC to recognize the Unisoc port, professional software creates a bridge to handle these protocols automatically. Dr.Fone – Screen Unlock (Android) is helpful here because it includes a built-in driver handling system that often bypasses the signature issues mentioned above.
While this is a paid solution, it eliminates the 45-minute trial-and-error process of the manual method.
Steps to Unlock:
- Launch & Select: Open Dr.Fone on your PC and select “Screen Unlock (Android).”
- Brand Selection: Choose “Xiaomi” from the list.
- Identify Model: Do not rely on auto-detection. Manually select “Redmi A5” or “Generic Unisoc” if the specific model isn’t listed immediately.
- BROM Connection:
- Turn off the phone.
- Connect via USB while holding Volume Up + Volume Down.
- The software will inject the specific V5 Auth 2026 boot file to remove the lock.
- Completion: Once the bar hits 100%, the phone will reboot. The “Google Verification” screen will be gone.
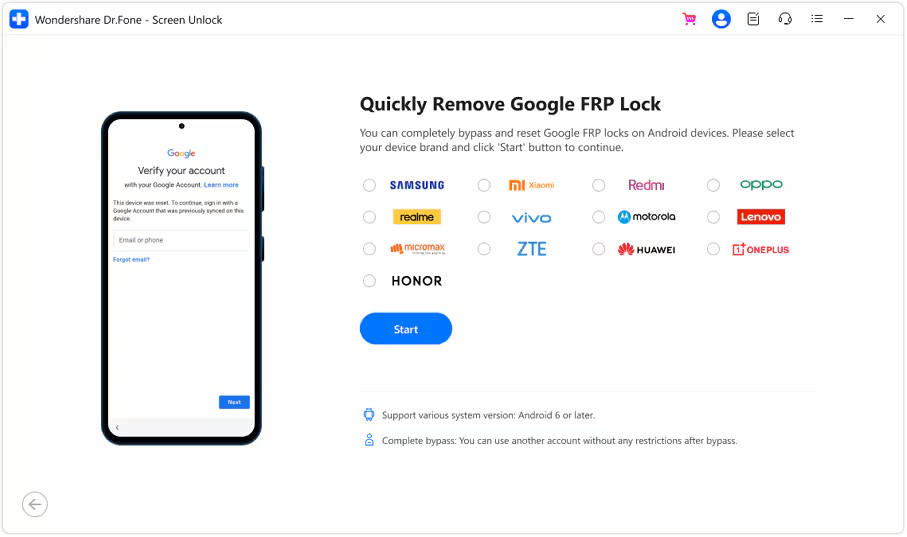
Dr.Fone interface performing a Xiaomi 25028RN03A Google account unlock.
Troubleshooting: Why TalkBack & YouTube Errors Occur
Understanding why the old methods fail can save you from trying dead exploits.
The “YouTube Update” Error
This is the most common roadblock in 2026. When you try to access the browser via the “YouTube Terms of Service” link, the app checks the server version. Since the factory version on the phone is old, it demands an update.
- The Fix: You must bypass the YouTube app entirely. Do not try to open YouTube. Use the Help & Feedback text selection trick (Method 1, Step 1 alternative) or the direct Voice Command “Open Settings” to skip the browser verification step.
“Port Not Found” or “Waiting for Device”
If you are using Method 2 or 3 and the software sits on “Waiting…,” your Windows PC has blocked the connection.
- The Fix: This is almost always a Driver Signature issue. You must restart your PC and follow the Phase 1 steps in Method 2 to disable enforcement. Simply reinstalling the driver without rebooting will not work.
“Just a Sec” Loop
If your phone spins forever after Method 1:
- The Fix: You likely enabled Play Services too early or too late. The timing is split-second. Watch for the visual glitch where the screen flickers or the text changes slightly—that is your cue to hit the Accessibility button.
FAQ: Common Questions About Redmi A5 Google Lock
Can I use the “Second Space” trick on Redmi A5?
No. The Redmi A5 runs Android 15 Go Edition. “Second Space” is a feature reserved for the full MIUI interface found on more expensive devices (like the Note series). This feature does not exist in the Go Edition operating system, so looking for it is a waste of time.
Is it safe to wipe the ‘Persist’ partition?
Absolutely not. Wiping Persist will remove calibration data for your sensors. You will likely lose your fingerprint sensor functionality, auto-rotation, and may face “Corrupted Storage” warnings. Only wipe the FRP partition.
Does Method 1 work on all security patches?
The manual loop method is effective on the February 2026 patch, but Xiaomi aggressively patches the “Assistant” entry points. If Voice Commands are completely disabled in a future update, you will be forced to use the SPD Tool (Method 2) or Dr.Fone (Method 3).
Conclusion
The Redmi A5 FRP bypass in 2026 requires adapting to the limitations of Android 15 Go Edition. The removal of “Second Space” and the hiding of system apps make this harder than in previous years.
For most users, Method 1 (The Manual Loop) is the best starting point—it costs nothing and works if you get the timing right. Remember to tap “Show System Apps,” or you will never find the setup wizard. However, if the timing proves too difficult or your patience wears thin, tools like the SPD Flash Tool (for experts) or Dr.Fone (for quick results) offer reliable “backdoors” into the Unisoc chipset.
Download Dr.Fone to Unlock Your Redmi A5 Now
